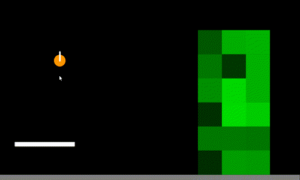
这是一篇关于目标是完成一个愤怒的小鸟克隆游戏的游戏作业代写,需要展示下面图片所示的行为。

以下是作业部分内容和要求:
Where do I submit?
There are eight graded assignments like this on the course. This one and three more make up the midterm assignment and are submitted in week 10. Nevertheless, we strongly recommend that you complete this graded assignment in the week it has been assigned and not wait for the midterm submission. You need to master the material included in these before you continue with the next weeks. Once you complete it, save it somewhere safe, do not share online using the webspace and upload it with the others when prompted in week 10.
Steps to complete
Start by downloading the template attached. The template code contains the sketch.js file which ties everything together and the physics.js file which contains physics-specific functions, moved to a separate file so that your code is cleaner. You’ll write most of your code in the physics.js file.
Creating a propeller system
Step 1: Amend the setupPropeller() function in physics.js to setup a static body of type rectangle at location (150, 480) of size (200, 15), similar to how the ground is created. Use the global variable propeller for this. The initial angle is equal to the global variable angle which we provided. Add the propeller to the world.
Step 2: In the drawPropeller() function set the angle of the propeller equal to the global variable angle. Set the angular velocity equal to the global variable angleSpeed already provided for you. Update the variable angle by angleSpeed. This will make sure the propeller actually moves at a rate of angleSpeed between frames. Draw the propeller using the drawVertices() helper function just like in the drawGround() function. In sketch.js, amend the keyPressed() function so that when the left arrow is pressed, the angle speed is incremented by 0.01. Do the opposite when the right arrow is pressed. If you’ve done things right when you start your sketch you should be able to control the propeller on screen using the left and right arrows.
Step 3: When ‘b’ is pressed a bird is created wherever the mouse is by calling the setupBird() function. Study that function. At the moment the program does not draw birds. Amend the drawBirds() function to loop over the birds array and draw them using the drawVertices() helper function. Use the isOffScreen() function to check if the bird has left the screen and, if it has, remove it from the physics world using the removeFromWorld() helper function provided and from the array. Remember to also decrement your for-loop counter in order not to break your code! Pressing ‘b’ should now create a new bird where the mouse is which flies away upon impact with the moving propeller.
Creating a tower of boxes
Step 4: Amend the setupTower() function to create a tower of boxes as shown in the picture above. Tower should be six boxes high, three boxes wide. Each box should be of size 80×80 pixels. (Hint: Create a nested for loop and push bodies of type rectangle on the boxes array provided). Also push a random shades of green onto the colors array. We’ll use those colors to draw the boxes later. Remember to add the boxes to the world.
Step 5: In the drawTower() function loop over the boxes array and draw each box using the drawVertices() helper function. Remember to use the random colors you created inside the colors array. You should now see a tower of boxes in different shades of green like in the image above.
Creating a slingshot
Step 6: Amend the setupSlingshot() function to initialise the global variable slingshotBird as a body of type circle in a similar place as shown in the image above. Give the circle zero friction and a restitution of 0.95. Set the mass of the slingshotBird as ten times its original mass, just like we have done for each of the birds in the setupBird() function.
Initialise also the global variable slingshotConstraint as a constraint that behaves and looks like the one shown above. Give it a stiffness of 0.01 and damping of 0.0001.
Remember to add both the bird and the constraint to the world and make sure they appear where they are in the image above.
Step 7: Amend the drawSlingshot() function and use the drawVertices() and drawConstraint() helper functions to draw the slingshot bird and slingshot constraint. If you’ve done things right you should now be able to control the slingshot with the mouse. Drag to extend, release mouse to release bird. Pressing ‘r’ resets the slingshot.
Step 8: Implement one of the ideas for further development.
…….


